
Since I got some requirement to separate a few different network segments on my IntelNUC and I would like to set up the DNS and DHCP services for that newly created internal network segment as well. I did research about it and learnt DNSMASQ is the good solution for it. This article would write down some steps for this setup.
Prerequisite
Firstly, I created 2 Linux bridge interfaces on my IntelNUC and setup one Linux VM as the router attached with these 2 interfaces.


Routing and NAT
Secondly, I enabled the ip forwarding functionality and NAT using iptables on the Linux VM and also setup the different ip segment addresses on both interfaces (192.168.0.0/24 and 10.1.1.0/24). As far, the Linux VM now is acting as the router can route the traffic between different ip segments. I setup NAT because I have one WIFI router which can only route my 192.168.0.0/24 traffic out, so I have to masquerade 10.1.1.0/24 to 192.168.0.0/24.
# sysctl -w net.ipv4.ip_forward=1
# iptables -t nat -A POSTROUTING -o ens18 -s 10.1.1.0/24 -j MASQUERADE
Installing DNSMASQ
Since I will install DNSMASQ on my Ubuntu 22.04 and starting from Ubuntu 18.04+ comes with systemd-resolve which you need to disable since it binds to port 53 which will conflict with Dnsmasq port. So I have to use the following commands to disable systemd-resolve, unlink /etc/resolv.conf and create the new one.
# systemctl disable systemd-resolved
# systemctl stop systemd-resolved
# unlink /etc/resolv.conf
# echo nameserver 8.8.8.8 | sudo tee /etc/resolv.conf
After all above, using the following command to install DNSMASQ.
# apt update
# apt install dnsmasq
DNS Config
DNSMASQ package comes with the default configuration that all config are comment out. You have to remove the comment and adjust it to fullfill your environment. Here comes my /etc/dnsmasq.conf for the DNS service.
# cat /etc/dnsmasq.conf | grep -v “^#” | uniq
port=53
domain-needed
bogus-priv
strict-order
server=/tunnel.com/192.168.0.74
interface=ens18
interface=ens19
bind-interfaces
expand-hosts
The server=/tunnel.com/192.168.0.74 is for my DNS tunneling testing and the ip address it my Kali which my dnscat2 server is running on it. If you want to add any DNS A record, you can easily modify the /etc/hosts file. Following is my example.
# cat /etc/hosts
127.0.0.1 localhost
127.0.1.1 router
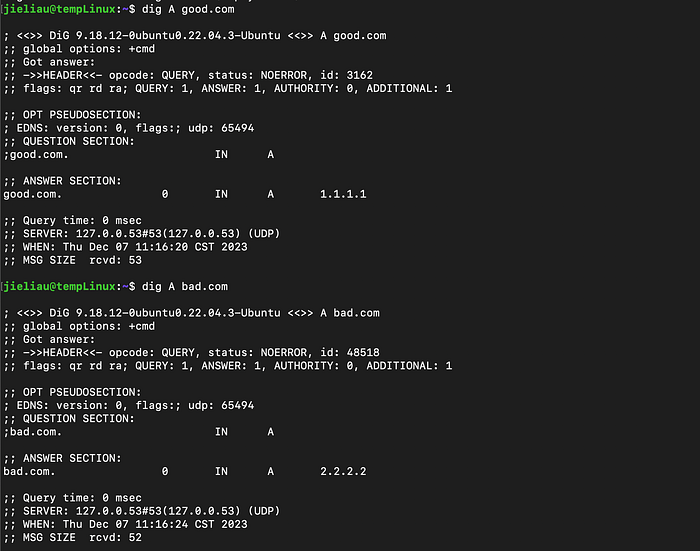
1.1.1.1 good.com
2.2.2.2 bad.com
DHCP Config
Here comes my config for DHCP service.
no-dhcp-interface=ens18
dhcp-range=10.1.1.50,10.1.1.150,12h
dhcp-option=option:router,10.1.1.1
dhcp-option=option:ntp-server,192.43.244.18
dhcp-leasefile=/var/lib/misc/dnsmasq.leases
Since I only need DHCP service running on the 10.1.1.0/24 ip segment, so I need to put no-dhcp-interface=ens18 to disable DHCP on ens18 which is 192.168.0.0/24 ip segment.
After all needed config are in place, we have to restart the DNSMASQ service. Use systemctl restart dnsmasq to restart our DNSMASQ.
Testing
After all needed installation and configuration, it’s time to test it. I created one VM and attached vmbr1(10.1.1.0/24) interface only. After VM boots up, I can see the ip address has been assigned automatically and we can also see there is one item in leases file.
$ cat /var/lib/misc/dnsmasq.leases
1701945038 06:06:2a:b5:23:29 10.1.1.117 tempLinux 01:06:06:2a:b5:23:29
Regarding the DNS testing, I use dig to test good.com and bad.com both domain which are configured under my /etc/hosts file.
Everything looks well and as my expectation. Wish this article helps in any way. Thanks for reading. Have a nice reading experience.
